Saving Searches

You can save a search history or individual searches for later use or further refinement. If you add annotations to your search history, they are saved too.

Saving a Search or Search History

  1. To save a single search, either select it and click the Save button, or click the More button and then select the Save option.
    To save one or more selected searches, select the searches and then click the Save button.
    To save the search history, click the Save All button.
    To save one or more searches as an AutoAlert, select the searches and then click the Create Auto-Alert button.
  1. If you're creating an AutoAlert, select the name of the editor and enter a note.

  2. Enter a name for the search and any comments.

  3. Select an option from the Type dropdown list.
Temporary Saves the search for a period of twenty-four hours, then deletes it.
Permanent Saves the search for as long as your site maintains a valid subscription. Use this option to save and rerun at another time or for base strategies from which you can develop further searches.
AutoAlert (SDI)

Creates a search that runs automatically on a regular basis and emails results to a designated list of recipients.

Searches developed in the Books@Ovid database cannot be saved as AutoAlerts.

Expert Searches

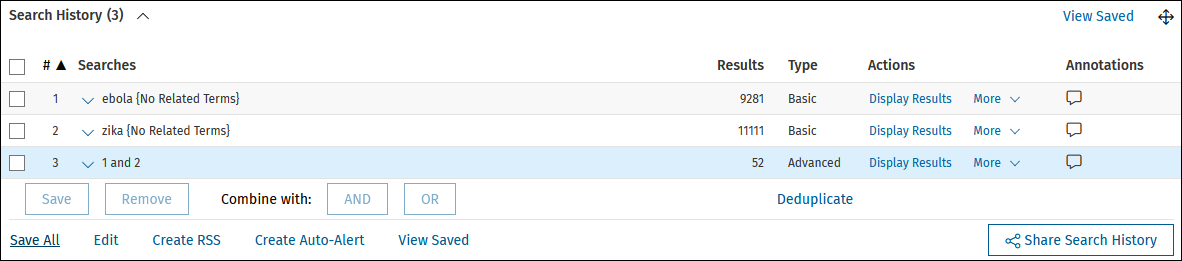
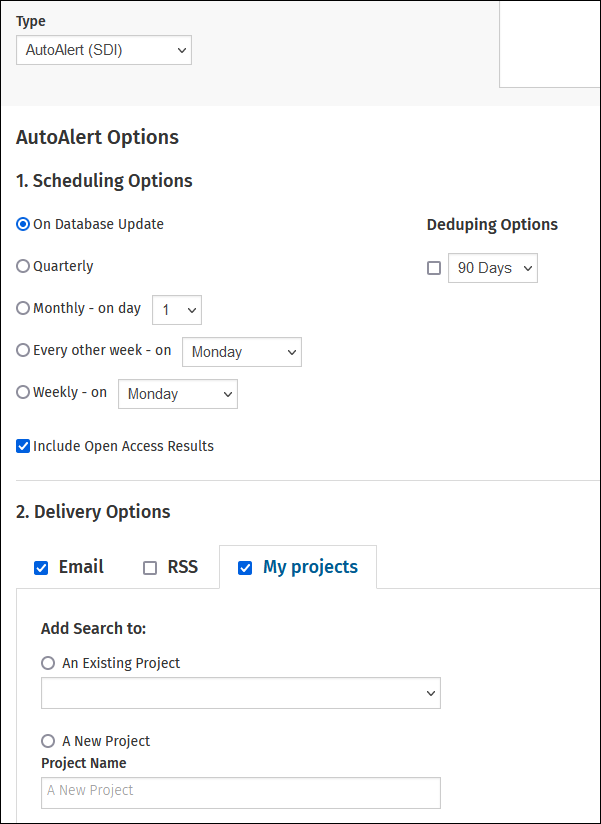
Searches about specific topics are made available to multiple users at a site. Expert Searches allow colleagues of the same group account to share search strategies.

When creating Expert Searches, include a reference to the database of origin (as in: expert_medf) in the name or comment field of the saved search. Expert searches can be run in any Ovid database. However, you obtain best results when you use the search in the database(s) for which it was intended.

Expert Searches are created by site administrators, librarians, or other subject matter experts. If you would like more information about Expert Searches, contact your site administrator.

Your site administrator configures the availability of search types at your site. If you have questions or would like to request a search type listed here, contact your site administrator.

My Projects Saves the search to an existing or new project within the My Projects area, if Personal Accounts are enabled at your site.
  1. Click the Save button.

Viewing Saved Searches

You may view your Saved Searches and alerts by selecting:

When you select either of these options, the system will display all your saved searches and AutoAlerts. Searches and autoalerts are organized by search type:

Expert Searches are developed by subject matter or site experts. Site administrators can provide search strategies that focus on a research topic.

Saving to Project

Select My Projects on the search type drop down window.

On the Project drop down list:

For reference purposes, you may provide a description for each item added.

When you are done, click on the Save button.

Adding AutoAlerts to a Project

To add AutoAlerts to a project: 

  1. Select Save All from the Search History window.

    add AutoAlerts

    Ovid opens the Save Search page:

    add AutoAlerts

  2. Select AutoAlert(SDI) as Type. The AutoAlert Options panel displays.
  3. Check the My Projects delivery option and click on the My Projects tab.

    From here, you can either choose to add it on an existing project, or create a new project for the AutoAlert.

  4. When you've finished, click Save.

For more support information and training content, please visit the
Ovid Tools & Resources Portal
.

Did you find this information helpful? Tell us.